Gif Making - Tumblr Posts
i need to learn gif making just for the scene where the van is rolling in tua s4. and everyone’s face and hair is all fucked up and fucking carol of the bells is playing. om nom nom, that was good fucking food. also baby shark was not there.
gif makers get at me fr how do y’all do this shit?
how to fix grainy gifs
you won’t 100% but this helps a little 💕
idk how many of you are using this already but hopefully it will help someone out when saving gifs. but basically in this tutorial kinda thing i’ll try to explain how to play around with your colour palette to have your choice of 256 colours bc PS can be a b*tch.
Keep reading
hiii ik you got an anon a while back about converting apngs to gifs, and i was wondering the same thing? whenever i try it scuffs up the quality a lot :(
-🍭
hi! i'm not sure whether the quality thing is because of the original image size or if there's a conversion issue, so i'll give a walkthrough of how i go about it and see if that helps! stickers are usually no larger than 300px, so that may be the reason that they appear blurry.
(1) Add Line Stickers Packer extension to your Chrome browser

(2) Go to the page of the animated stickers you want to download, and click on the "PC" button underneath "Animated/With voice/Pop-up packs"

(3) Extract your files! The .apng files for the animated stickers are located in the "animation" folder.

(4) Upload the sticker you want to convert into a gif to Ezgif's file converter & click on "Convert to GIF!"
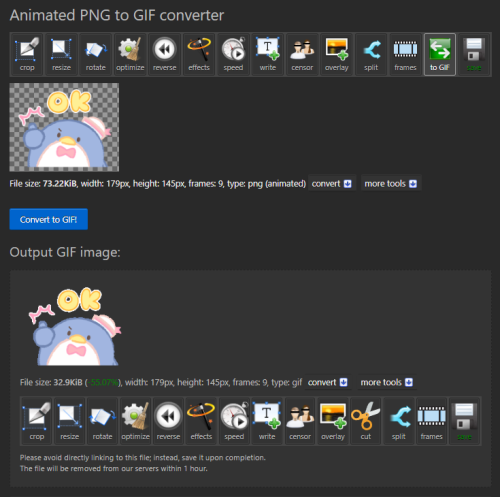
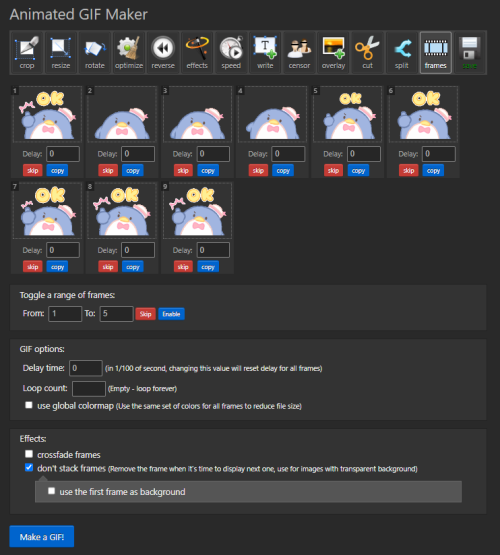
(5) Click on "frames," then set Delay time to 0, check "don't stack frames," and click on "Make a GIF!" This will make your gif loop forever instead of only playing once.
(6) And now you have a gif :-)!


(Bonus) The creator of the sticker packer also wrote a program to batch convert gifs into apng, which you can download here. This is helpful since a lot of batch convert sites like freeconvert have limits on how many files you're allowed to convert at once. You can follow the tutorial to learn how to use it! It's in Chinese but the translation tool is accurate 👍
I don’t know shit about gif making but y’all’s funky little moving pictures be bringing me so much serotonin. They’re so pretty and then y’all notice these cool parallels in the shows and make gifs from them. And when y’all think of quotes and song lyrics that perfectly match characters/ships/scenes??? Iconic. And your gifs make me notice little details in the show that I didn’t always catch from watching it in real time or just let me relive some of my favorite scenes in a new and creative way. Anyway y’all are the best. Shoutout to the gif makers.
i've been noticing for a while now, that a lot of gifsets with poc characters, especially athena and ana, make them look way too pale or whitewashed. this is especially the case when people do pastel/overly bright coloring. i'm not trying to call anyone out, it's a common mistake and it's very easy to go wrong, i just want to link a couple of tutorials here to help correct those mistakes.
this is a general anti-whitewashing tutorial and a good place to start.
this is a guide on how not to make your poc characters look too red/orange.
this is a tutorial on how to make pastel gifs without whitewashing poc.
i know gifmaking is tough without worrying about whitewashing, but it's a real problem, and all it takes are a couple of layers to fix it! you could also use a vector mask to see the before and after coloring of your gif, and if you're still not sure of whether it looks okay, ask other gifmakers!
hi, pls tell me how to make sure my dark scene gifs don't come out grainy or with noise.
(asked may 31, 2022)
hi there! i'm sorry this is really late, couldn't be around that much.
my dark scenes gifs have been luck and pray, but i have the second part of my tutorial here (first part here)
also, super recommend follow hvitserkk tuturials!
One thing I really love about seedy anime websites and YouTube mp3 converters is like. They actually do what they say they’re doing. But they WILL try to trick you into downloading a virus. Like it’s almost just a greeting at this point. I try to extract a song from a YouTube video and it says free VPN installer tonight perhaps? Free VPN installer tonight queen? And I say YouTube-mp3 converter you sly dog, you know what I’m here for. Show me the goods. And YouTube-mp3 converter says ahhh you got me, no getting one over on you. Thought it was worth a try tho. Here you go king x
my gif making routine (without load files into stack)
you don’t need any knowledge about making gifs, that’s pretty much the point of this tutorial, so if you’re new to photoshop, this tutorial might be helpful
it would be really nice if you could like this post if you like this tutorial or find it useful
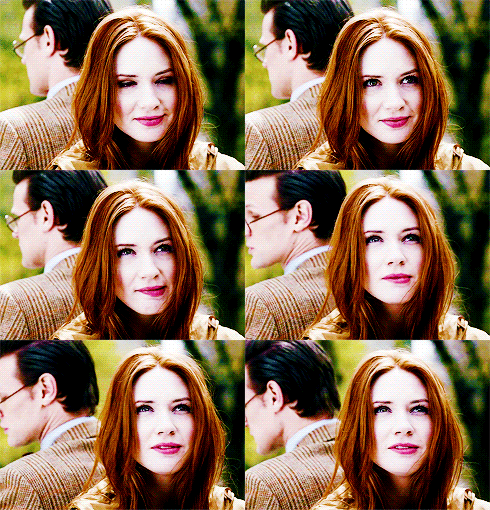
this is the result:
Keep reading
Big ass gif tutorial
It’s been a while since I made a coloring tutorial, and I thought it would be useful if I made a full tutorial on how I make my gifs. I will go over:
how to screencap
making your gif in ps
sharpening
coloring that gif
putting subtitles on a gif
saving that gif
you will need
a hd copy of the episode/movie you want to gif
potplayer (or kmplayer)
a version of photoshop (I use CC)
a sharpening action
A psd or patience to color your own gif
end result:

Everything will be under the cut. Warning: this will be picture heavy and text heavy. English is my third language so there will probably be some mistakes in here.
Keep reading
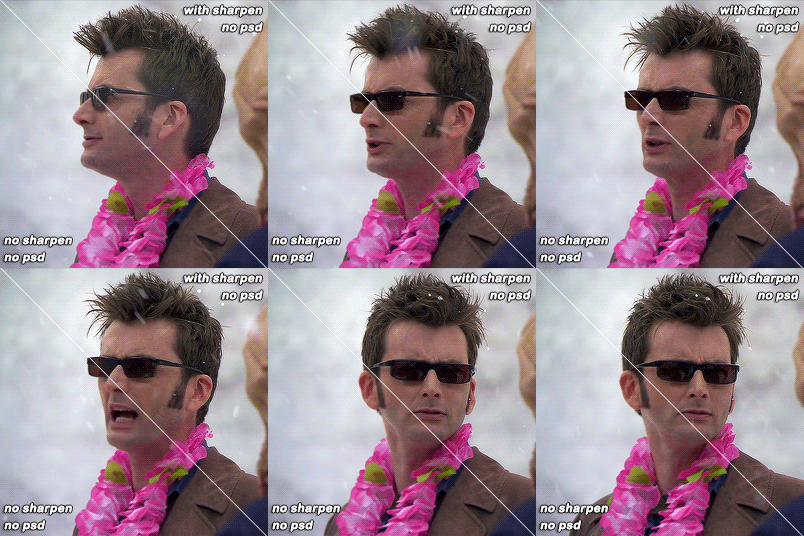


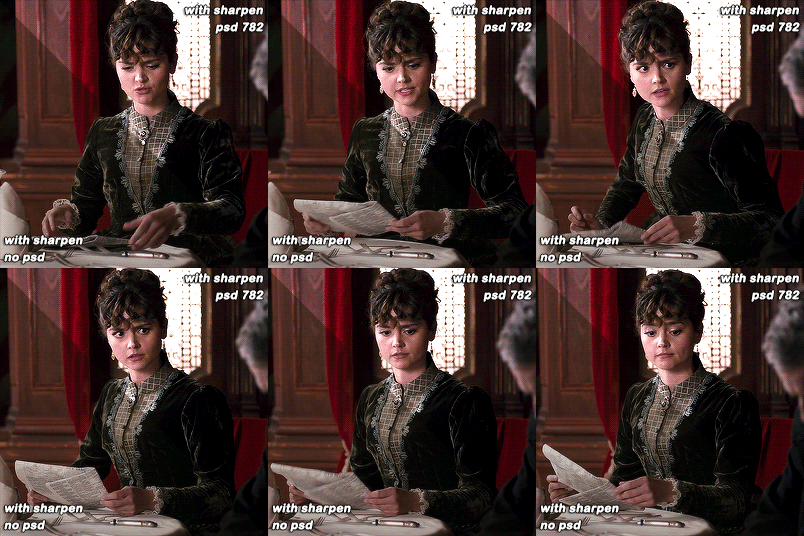
maziekeen’s gif sharpen action #2
important: this action will give you the finished gif with sharpen and proper speed, similar to the action i use in my tutorial for photoshop cs5
useful links:
download the action (updated with v2)
download the psds
crop sizes (new dimensions)
text settings
save for web & devices (gif settings)
my ko-fi <3
my coloring tutorials:
two parts tutorial, more detailed and with tips
hthaigtct tutorials, small ones from scratch no base psd
notes:
for the sharpening action i used the settings from completeresources tutorial, with one little adjustment and i also left the option to do it so you can adjust as you wish
as i said before, this will work for photoshop cc (probably cs6+ since that’s when the sharpen changed from cs5)
here i assume that you know the basis of how to make a gif (take screencaps or upload the video in photoshop) crop and things like that. if in doubt, check out steps 1 and 2 of my tutorial here
how to use:
1. once you have loaded the screencaps and cropped the gif, choose the appropriate action. DICOM Files and Load Files Into Stack you use depending on the way you loaded the screens on photoshop
2. the part 1, the action will “make” the gif for you and add sharpening, two pop ups will open for the sharpen:
the frst one is the sharpening itself: amount 500% and radius 0.4px — press ok or hit enter to continue
the second one is the amount of blur, change the opacity to soften the sharpening a bit, then you can adjust according to the preview — press ok or hit enter to continue
if you messed up or the settings isn’t quite right, you can adjust here:

3. now that you are satisfied with the sharpness, play part 2 to finish the gif and you are done. what this part two does is fix the speed of the gif back to 0,05
done! if you have any questions or need help, send me a message

hello and welcome! this is my spin on a comprehensive giffing tutorial that not only covers the basic mechanics of how to gif, but also goes into the tips, tricks, and general photoshop information i’ve learned since i started giffing and now wish i could beam into my past self’s brain. this tutorial will walk you through everything from start to finish, help explain what not to do and why, and hopefully give even experienced gifmakers some new information!
note: this tutorial is very long and image-heavy, and is best viewed on dash
WHAT YOU’LL FIND IN THIS GUIDE
software needed
sourcing + storing footage
giffing: methods + step by step process
actions
coloring
text: subtitles, fonts, etc.
saving: timing, settings, exporting
posting: captions, tags, scheduling
resources
Keep reading
gif psd tutorial #2
Hello!!!! This is an updated tutorial on how I do my psd/colorings. My current way of making psds isn’t really that different from my old way. There’s only a few differences. You can view the first tutorial here. Please like or reblog if you find this tutorial useful :)
***You will need to have basic knowledge of photoshop and gifs to follow this tutorial***
In this tutorial, I will be turning this
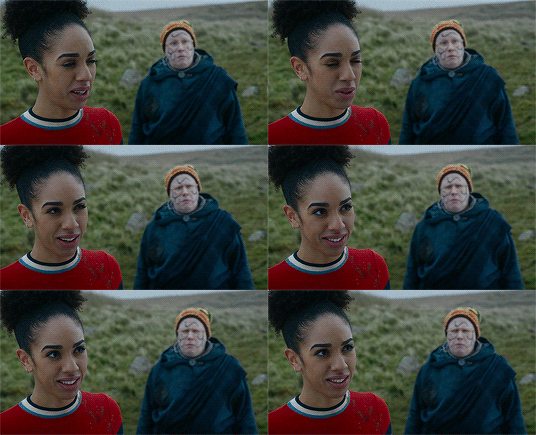
to this:

Keep reading

A gif colouring tutorial! (requested by the lovely, @ncutisgatwas). I keep my colourings super simple and easy to follow! So I'm happy to show what I do to achieve it!
I always start really simple with CURVES, I always select auto for this because I never like to artificially brighten the gif because sometimes it's too much?

So far, with just that our gif looks kinda plain but brighter,

Next, is LEVELS. I use the same for every single gif I make, the only thing I ever change (say the gif is in broad daylight etc) in the middle one, I either have it at 0.90 or 1.09. 0.90 for when the gif needs to be darker and 1.09 for when the gif needs to be brighter!

Same for our next step which is, BRIGHTNESS/CONTRAST. Again, I rarely ever change these, I never turn it brighter than 20 (you'll see why later), but if it's a lighter scene I usually have brightness on 10 instead of 20 same for contrast.

Next, COLOUR BALANCE. Now, I rarely use this (in other words if you gif doesn't need it you can skip this step because I usually do with all my other sets!) but if your gif does call for this, these are the main settings I use for more blue tone gif sets. Below you can see the difference, it brings back more of his skin tone and vibrance to the gif without actually adding vibrance.

after the colour balance:

Now, EXPOSURE. For this one, I literally eyeball it. I drag it until I think it's a good brightness! if you have a gif like this where the subject goes from side on to front on always make sure you scroll and check when they're turned (it can wash them out once they face the light source!)

Now for SELECTIVE COLOUR, like the other step I do this for every gif same settings. I always use these RED settings because I find it protects the true skin tone without giving it a too over the top red/yellow colour. It's also perfect if you're giffing POC actors!


I add another BRIGHTNESS/CONTRAST layer but this is mainly because I think the gif is a bit washed out without the darker bits standing out more! (THIS IS COMPLETELY OPTIONAL!)

And finally, once more COLOUR BALANCE. I simply felt it still looked a little too washed out for his skin tone and the colours in the room!

And that's our gif done!!

I use these same settings for every gif minus the colour balance. Always make sure to adjust the CURVES and EXPOSURE! If you have any more questions, my ask/dms are always open!
how do you sharpen your gifs???? they're insanely high quality!
Hello, Anon dearest, and thank you so much! ✨ To answer your question properly, I would first have to know which gifset(s) of mine you're referring to because I've made a lot over the years and I often change my sharpening settings, too. It totally depends on what I'm working with at the moment, to be honest. 😅
But, as for the last few sets of mine (this, this, and this in particular), I used these settings:

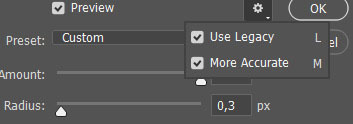
After converting my frames/layers into a smart object, I applied the settings above. Remember to click on the gear icon in the upper right corner and check both 'Use Legacy' and 'More Accurate' as well. This will make your sharpening look more 'natural' and less cakey imo.
Below is a comparison of before and after:


Note: This Geralt screenshot was taken from a 4K (2160p) video. Most videos I work with are at least 1080p or 720p because quality matters.

And here's the final result: colored, brightened, and sharpened.
—
I hope this answers your question. If not, feel free to send me more questions about this kind of stuff. I'm always happy to help out :)
Hi! Could you make a tutorial on how to make a gif that has good quality? If you do not mind
For 30fps (normal) gifs:


For ultra smooth 60fps (usually for ts files):
60fps is fantastic for short shots, such as live performances where the camera changes scenes every second or two. It gives you HD quality without the gif seeming too short.
Be aware that in order for the 60fps processor to work correctly, you either have to have a file that specifically states it’s 60fps or a .ts file (found on sites like twitter, kpop24hrs.com, etc).
Even if you process a normal .mp4 or .mov file with 60fps, it’ll just double every frame and you’ll end up with a weirdly slow gif. So just use .ts or 60fps videos okay?


PS export settings for either 30fps or 60fps
These export settings stay the same for both. Most important thing you can do is set your gif to original, NOT optimized. Toggle between them and you’ll see why.

Final comparison
Here are two gifs of the same scene. Both gifs have 60 frames, and are using the settings above. You can see doing 30fps allows a longer scene, while using 60fps looks smoother. So it really just depends on your preference.


Hope this helps at least one person!


a gif tutorial by osvaldrps + sharpening action
i was asked if my old-old gif tutorial (you can find it here) is still valid a lot and i’ve decided to update it with the video. so here we are!
i’ve recorded every step i usually make when making gifs and tried to explain as much as possible. it doesn’t have audio (except for music) since i don’t have an opportunity to record it atm but i’ve added subtitles so don’t forget to turn them on. you can find the tutorial down below, my sharpening action is linked too. hope it’s helpful. don’t hesitate to contact me if you have any questions! (and lmk if subtitles are too fast to read)
watch the video // download the action
How I Make Gifs ~ For Anon ❤️


An anon asked me if I would ever consider doing a tutorial for how I make gifs! It's very flattering that you like my gifs enough to want to know exactly how I make them, so here is a little tutorial using my favourite character from my favourite movie ❤️
I might also make a separate tutorial for giffing dark scenes later 😌
Here's a download of my gif in PSD form if you'd like to get a better look at the settings I used.
Programs used: PotPlayer, Photoshop.
First, you need to get your screencaps. I would suggest using a high quality recording of whatever movie/TV show/video you want to make gifs of. My recording of Fellowship is in 1080p, and the quality looks incredible!
I use PotPlayer to get my screencaps. To do this, open the video file in the program and find the moment you want to gif. It's probably best to go back to just before that particular moment, and then press Ctrl + G. This will bring up the consecutive image capturer window. Below are the settings I use to get my screencaps:

Then, press start and wait for your moment to be captured! Once you've got everything you need, press stop and navigate to the folder that you indicated under storage. Here you will find all of your screencaps! You probably ended up with way more than you need (I know I certainly did 😅). Now, delete all of the screencaps that you don't want in your gif.

For the actual gif making, I use a cracked version of Photoshop. I don't exactly remember where I found it unfortunately, but I'm sure that there's people out there who might have some links handy if you look around! Once you've got PS open, navigate to File > Scripts > Load Files Into Stack... and click on it! That will open the Load Layers window.

Now, change Use to Folder. Then, click browse and navigate to the folder that contains your screencaps. Click select folder, and after a few moments of loading your window should look more like this.

Then, press OK, and wait for your layers to load. Depending on how many caps you have, it could take longer. Once it's finished loading, you need to decide on your gif dimensions! For this, I decided on 268px x 225px. Once you've chosen your size, use the crop tool to get your gif to that size. Now, you should have a smaller image, like this:

The next step I do is to use this Photoshop action by @maziekeen. They have a little tutorial on how to use this action there, so I'll just say that once you've loaded it into your program, use part 1 / load into stack. Press the play button, and then the OK button on the two windows that pop up. Now, your gif will be nice and sharpened, and you'll be able to see it move for the first time! Here's what mine currently looks like, without any other edits:

Now, it's time to start on colouring. Every gif (or scene, sometimes you can reuse the same colouring if you're giffing an entire scene) is different, so it will have different needs. However, I tend to always use the same layers in the same order for all of my gifs — it's just the settings that change. I think the colouring of this particular scene is lovely, so I don't want to change it drastically, I just want to enhance it.
First, I create a Curves layer. At this point, I also like to make a group to hold all of my adjustment layers. This makes it easier for you to switch your adjustment layers on and off if you want to compare with the original colouring!
Going back to your curves layer, pick the little white eyedropper tool in the Properties tab. You want to find and click on the whitest area in the gif and make it a bit brighter! I picked the white in one of Boromir's eyes.

This is what my gif looks like now with the Curves layer:

Next, I use Levels. It's a very subtle change, but you can notice a slight darkening of the blacks in the image. Here's my settings for this layer:

And here's the gif with this step applied. Like I said, it's a very subtle change:

Up next is Brightness & Contrast. This layer is just a case of messing around with the settings until it looks right for you. You don't want to make it look too bright or too contrasted, though, because it will make the colouring look weird.

A bit more of a change this time! We're getting there:

Next, I like to do Colour Balance. Sometimes I wait and do the Selective Colour layer first (it'll still be above Colour Balance though), but with this gif, I decided to do it first. I want Boromir in the foreground to contrast more with the watery background, so I upped the Red in the Midtones. I think Midtones is the most important part of Colour Balance, so the Highlights and Shadows are more minor adjustments here.


Here's the gif with the Colour Balance layer!

Now, we have Selective Colour. Like I said before, I sometimes like to do this layer and then go back to the Colour Balance to make minor adjustments. For this gif I mainly focused on slightly reducing the cyan in the reds and yellows to add a little more colour to Boromir's tunic and hair.

I'm a big fan of bright, vibrant gifs, so I like to use the Vibrance layer copiously.

I upped the vibrance to max, but it's left Boromir's face looking a bit too red and his neck is a little pink, so I went back and did some minor adjustments to the Colour Balance and Selective Colour layers to fix that. Then, voila!

Now that we're done with colouring, go back to the beginning of the timeline at the bottom the screen. Then, go back to Actions and scroll down to the bottom, and look for the action called part 2 / finishing. Just like with the first action, press the Play button and it will work its magic!
Press Ctrl + Shift + Alt + C, and try playing your gif from there. Sometimes, the gif will be too fast and you'll need to slow it down, and you can't always tell until you play it in the 'Save for Web' window. I ended up slowing mine down from 0.05 to 0.07.
Once your gif is looking just right, press Ctrl + Shift + Alt + C again. These are the settings I use to save my gifs, and I think it makes them look really nice! Then click Save, and save your gif wherever you want.

Now, once you've saved your gif, you can post it to Tumblr (if that's what you're wanting to do) or simply keep it to yourself! But I'm sure that others would love to see your creations :D
***
A little extra info - this gif doesn't have text because there's no dialogue, but these are the settings I use for gifs with text (the text size depends on the dimensions of the gif):


Sometimes I use white text, sometimes I use yellow. And if there's more than one person talking I use both!
I hope that this tutorial was helpful, and if you have any more questions, feel free to ask!
I feel bad that I can't make better gifs on my laptop because I'm running on limited hard drive space with a garbage AMD processor.
Kyle MacLauchlan YouTube Videos
Dear anyone and everyone, Please send me videos you find on YouTube that feature Kyle MacLauchlan so I can make gifs! I've found some but id love to have some more, I cant promise any gif deadline because of my college and work schedule but I promise I will make them!!
More to come, just dusting off my skills 😵💫


Head Engineer is such a dream😍